- 1 Quick Deal Snapshot
- 2 What You Need Before Installing WordPress
- 3 Method 1 — How to Install WordPress on Hostinger (Step-by-Step)
- 3.1 Step 1: Log In to Your Hostinger Account
- 3.2 Step 2: Choose Your Website Type
- 3.3 Step 3: Select “Create a New Website”
- 3.4 Step 4: Connect Your Domain
- 3.5 Step 5: Update Nameservers (Only If Domain Is from Another Registrar)
- 3.6 Step 6: SSL Gets Installed Automatically
- 3.7 Step 7: Go to Your Websites Dashboard
- 3.8 Step 8: Open the Auto Installer
- 3.9 Step 9: Select WordPress
- 3.10 Step 10: Enter Your WordPress Login Details
- 3.11 Step 11: Choose WordPress Version and Update Settings
- 4 Step 12: Access WordPress Overview in hPanel
- 5 Method 2 — Manual WordPress Installation (Full Control)
- 6 Which Hostinger Plan Do You Actually Need?
- 7 Common Errors After Installing WordPress (And How to Fix Them)
- 8 What to Do After WordPress is Installed
- 9 A Quick Note from Personal Experience
- 10 Frequently Asked Questions
- 10.1 Can I install WordPress on Hostinger for free?
- 10.2 Which method is best for a complete beginner?
- 10.3 Does Hostinger install WordPress automatically?
- 10.4 What’s the difference between hPanel Auto Installer and Softaculous?
- 10.5 Will my WordPress site slow down on Hostinger’s Premium plan?
- 10.6 Is there a free trial on Hostinger?
- 10.7 My domain is registered with GoDaddy or Namecheap — can I still use it on Hostinger?
- 10.8 Can I change my WordPress admin username after installation?
- 11 Bottom Line
Setting up WordPress on Hostinger takes less than 5 minutes if you know what you’re doing. The problem? Most tutorials dump all four methods on you without telling you which one actually matters for your use case.
This guide covers the three practical methods — hPanel Onboarding (fastest), Auto Installer (flexible), and Manual (full control) — with real screenshots, a working coupon code, and the fixes for errors that trip up most beginners.
Quick Deal Snapshot
Before we start — if you haven’t bought Hostinger yet, here’s the best current pricing:
- 🟣 Premium Plan — $2.99/mo (48-month plan, 75% off)
- 🟣 Business Plan — $3.99/mo (48-month plan, 78% off) — Most Popular
- 🟣 Cloud Startup — $7.99/mo (48-month plan, 71% off)
- 💰 Use code WPDEALSEXPERT for an extra 7% off
- ✅ Free domain included + 30-day money-back guarantee
- 🔗 Grab Hostinger at the lowest price →
Coupon Code: wpdealsexpert
What You Need Before Installing WordPress
WordPress itself is free. What you’re paying for is the hosting — the server where your site actually lives.
Before hitting install, make sure you have:
- A Hostinger hosting plan (any plan from Premium onwards works)
- A domain name — either registered separately or the free one that comes with your plan
- Your hPanel login credentials — the email and password you used when signing up
That’s it. No FTP client is needed for the methods most people will use.
If you haven’t signed up yet, I’ve covered the full process in this guide: How to Sign Up with Hostinger. And if you’re still deciding on a domain, this one helps: How to Choose the Perfect Domain Name.
One thing most beginners miss — if your domain is registered somewhere else (GoDaddy, Namecheap, Google Domains, etc.), buying a Hostinger plan alone won’t connect the two. You’ll need to log into your domain registrar’s account and update the nameservers to point to Hostinger.
Hostinger’s nameservers are:
- ns1.dns-parking.com
- ns2.dns-parking.com
You’ll also find these inside hPanel when you go through the domain connection flow. After updating, DNS propagation can take anywhere from 2 to 24 hours — your site may not appear live in all regions during this window. That’s completely normal, not an error.
If you’re registering a new domain directly through Hostinger (which comes free with all plans), this step is handled automatically. Nothing extra to do.
Quick Answer: For most beginners, the hPanel WordPress Onboarding flow is the fastest and cleanest way to get WordPress installed on Hostinger — takes under 5 minutes, no technical knowledge needed.
Method 1 — How to Install WordPress on Hostinger (Step-by-Step)
This is the method most Hostinger users will follow — straightforward, no file uploads, no database setup. The Auto Installer handles everything. Here’s exactly what each screen means and what you need to do.
Step 1: Log In to Your Hostinger Account
Go to hostinger.com and log in with your registered email and password. You can also sign in using Google or Facebook if that’s how you created the account.
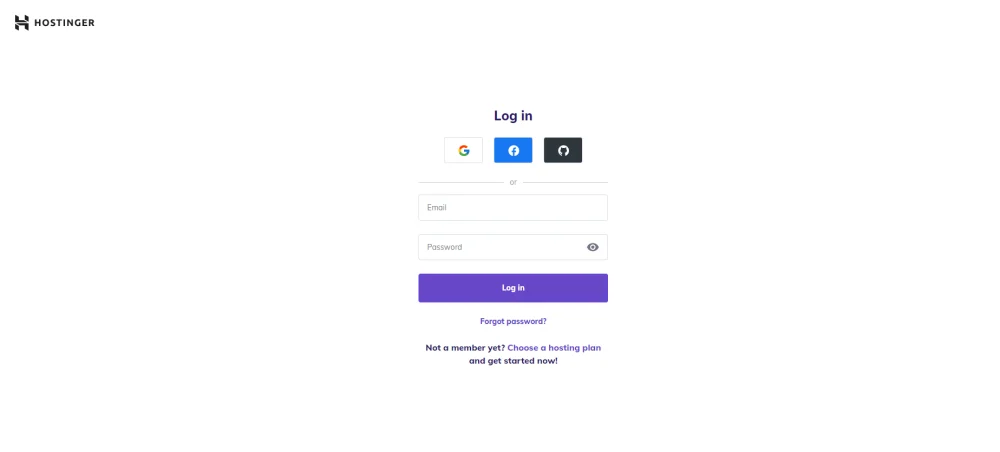
Once logged in, you’ll land on the hPanel dashboard. Everything you need — hosting, domains, websites — is managed from here. No cPanel, no confusing tabs.
Step 2: Choose Your Website Type
After clicking Create or migrate a website, Hostinger asks what kind of site you’re building. Options are Online Store, Blog, Business, Portfolio, or Other.
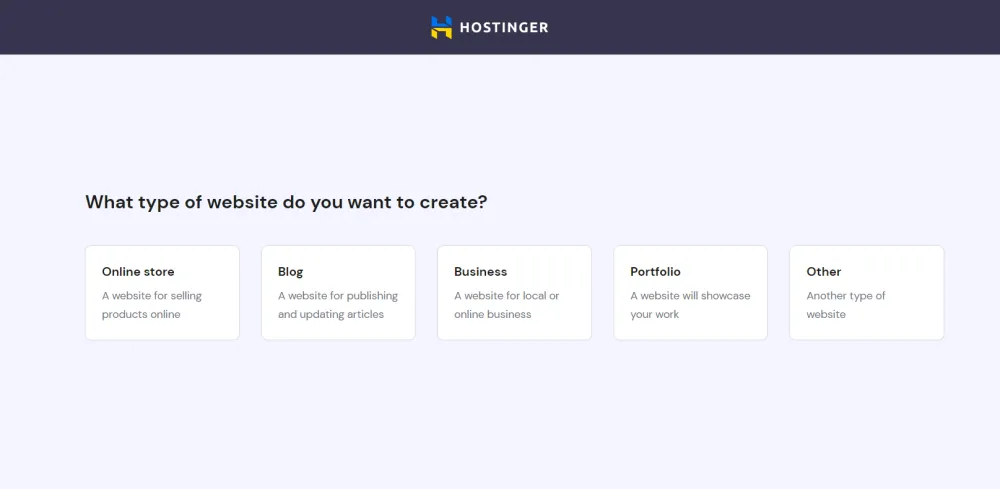
Pick the one that matches your goal. This doesn’t lock you into anything technically — it just personalizes the setup flow slightly. For a blog or affiliate site, select Blog.
Step 3: Select “Create a New Website”
On the next screen, you’ll see two options: Create a new website or Migrate my website. Since we’re starting fresh, click Select under Create a new website.

If you’re moving an existing WordPress site from another host, the migrate option handles that separately. Skip it for now.
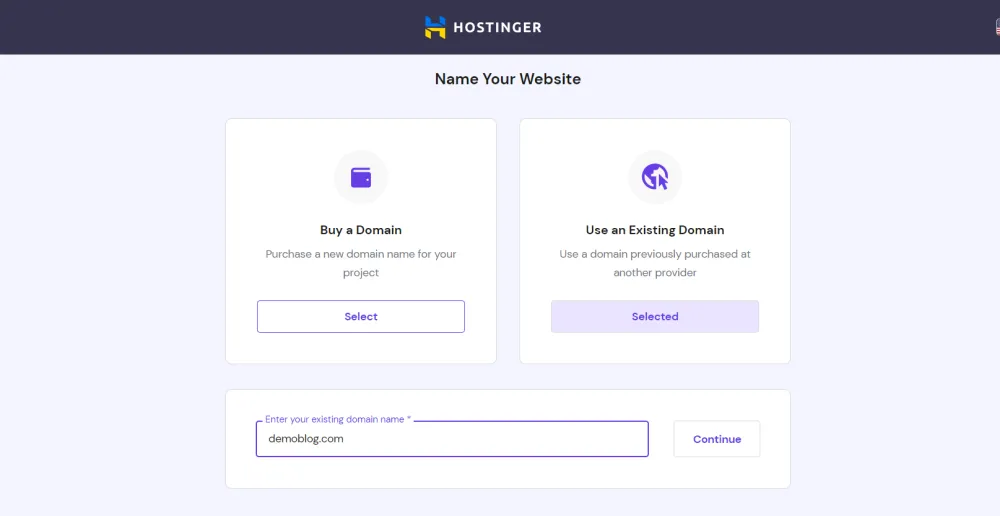
Step 4: Connect Your Domain
This is where you name your website. Two options appear — Buy a Domain (register a new one through Hostinger) or Use an Existing Domain (connect one you already own).
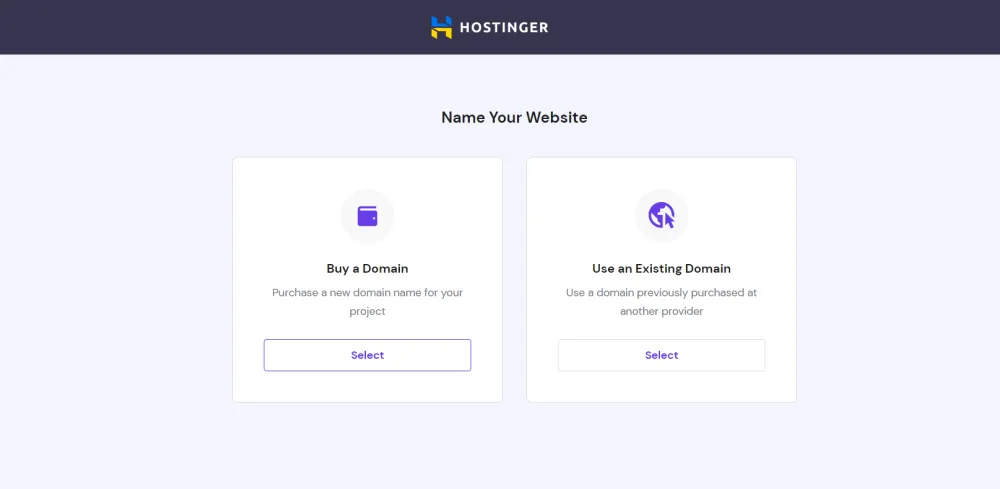
If your domain is already registered with Hostinger, it’ll appear in the dropdown automatically. If you bought it from GoDaddy, Namecheap, or anywhere else — select Use an Existing Domain and type it in manually.
Step 5: Update Nameservers (Only If Domain Is from Another Registrar)
If you entered an external domain in the previous step, Hostinger shows you this screen — your current nameservers on the left, and the required Hostinger nameservers on the right.
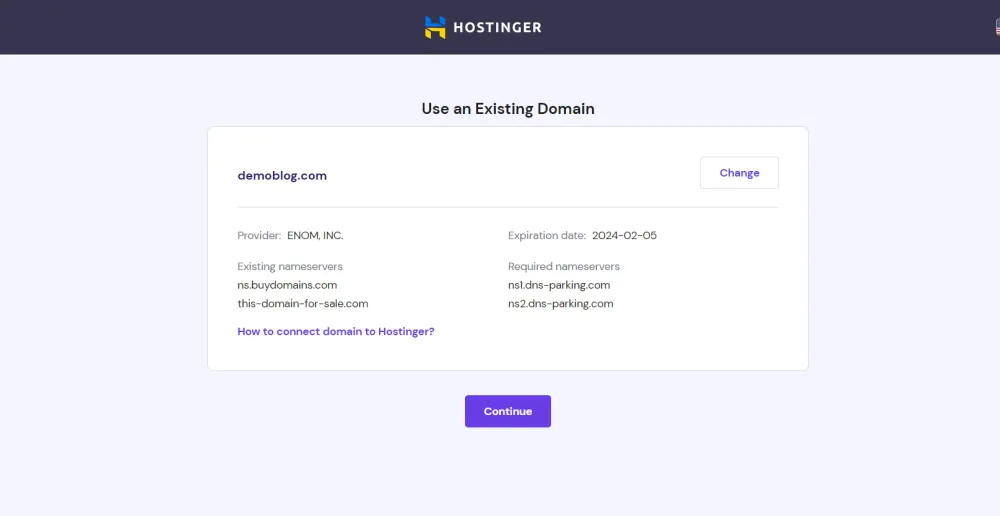
Log in to your domain registrar (GoDaddy, Namecheap, etc.) and replace the existing nameservers with the ones Hostinger shows here. DNS changes take 2–24 hours to propagate globally. Your site won’t go live until this is done — this is the step most beginners skip and then wonder why their domain isn’t working.
If your domain is registered with Hostinger directly, this screen won’t appear at all.
Step 6: SSL Gets Installed Automatically
Once the domain is confirmed and the website creation process starts, Hostinger automatically installs a free SSL certificate on your domain. You don’t need to do anything here — just wait for it to complete.

This makes your site HTTPS by default from day one. No manual SSL setup, no separate purchase. It’s one of the cleaner things about Hostinger’s setup flow compared to older cPanel hosts, where SSL used to be a separate step.
Step 7: Go to Your Websites Dashboard
After setup completes, head to Websites from the top navigation in hPanel. You’ll see all the websites connected to your account listed here with their hosting plan details.
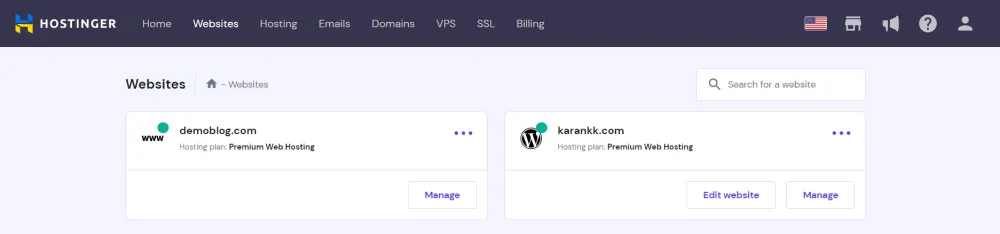
Click Manage on the website where you want to install WordPress.
Step 8: Open the Auto Installer
Inside the hosting dashboard for your website, scroll down to find the Auto Installer tile. It sits alongside File Manager, Databases, and other tools.
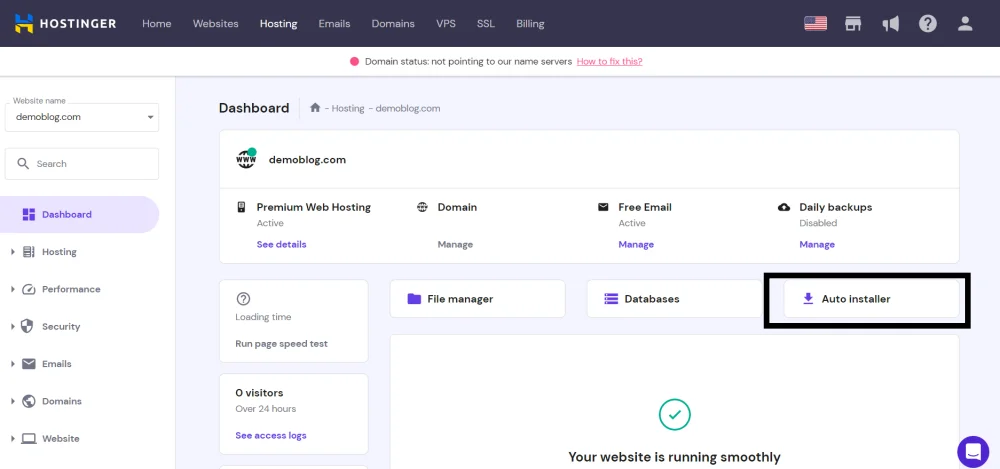
Click on Auto Installer. This is where WordPress gets installed — no manual file uploads needed.
Step 9: Select WordPress
The Auto Installer shows you several CMS options — WordPress, WooCommerce, Joomla, and others. Click Select under WordPress.
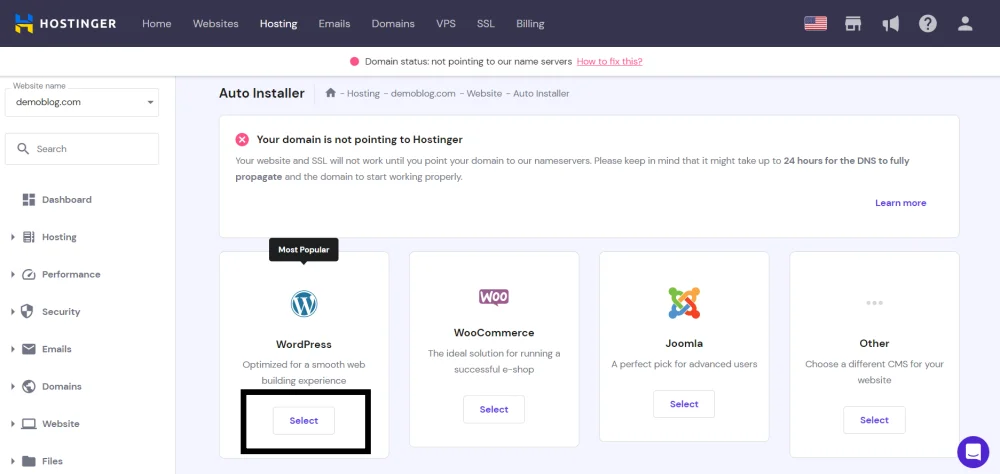
WordPress is marked Most Popular for a reason — it powers over 40% of the web. Unless you specifically need WooCommerce as a standalone install or Joomla for a specific project, WordPress is the right pick.
Step 10: Enter Your WordPress Login Details
Fill in the website credentials form — site title, admin email, username, and password. These are your WordPress login details, separate from your Hostinger account.

A few things worth noting here:
- Don’t use “admin” as your username — it’s the first thing brute-force bots try
- Use a strong, unique password — different from your Hostinger password
- The email you enter here is where WordPress will send admin notifications and password reset links — make sure it’s one you actually check
Click Next when done.
Step 11: Choose WordPress Version and Update Settings
On this screen, select your preferred WordPress version (stick with the latest recommended one) and choose your update schedule.
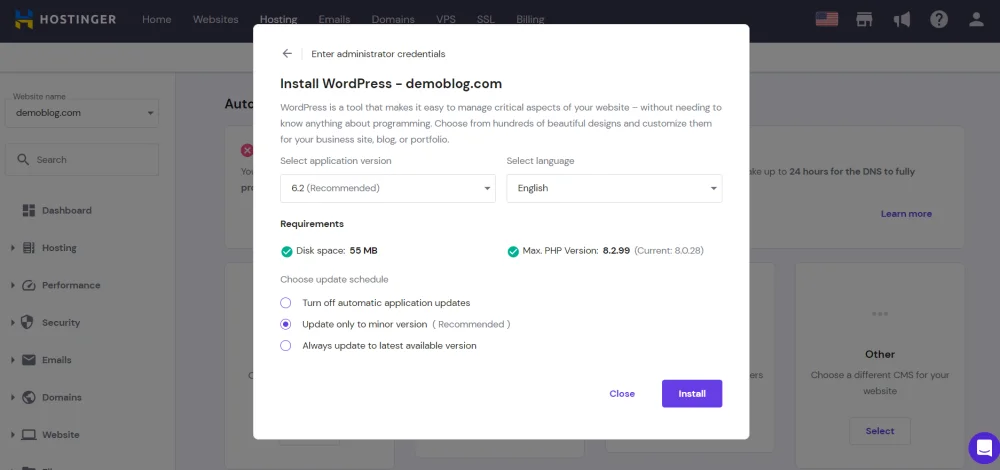
The Update only to minor version option is what Hostinger recommends — and I’d agree with that. Major version updates occasionally break plugins or themes, so it’s better to handle those manually after checking compatibility. Minor updates are security patches — those should go out automatically.
Click Install.
Step 12: Access WordPress Overview in hPanel
Once WordPress is installed, go back to your website in hPanel, and you’ll now see a dedicated WordPress section in the left sidebar. Click on Overview.
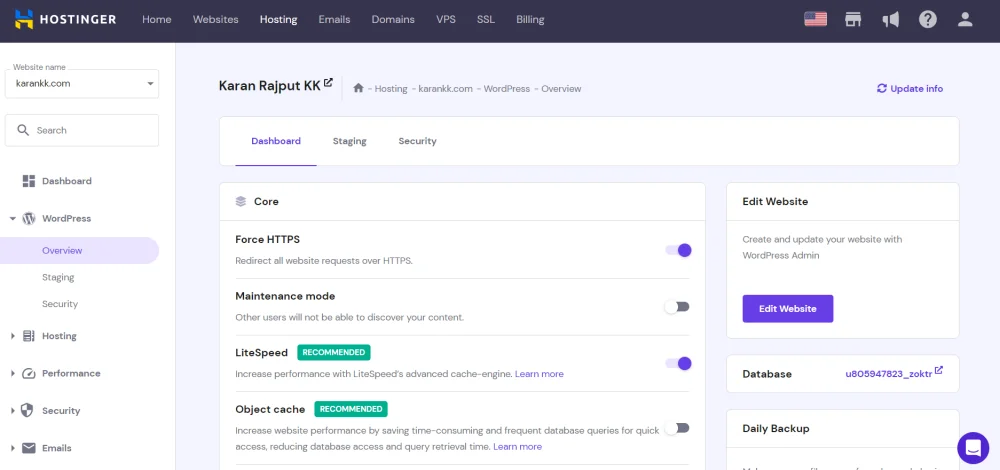
This is your WordPress management hub inside hPanel. A few things to do immediately from here:
- Force HTTPS — toggle this on right now. Don’t leave it off.
- LiteSpeed — if it shows as Activated, you’re good. This is Hostinger’s server-level cache engine, and it works natively with the LiteSpeed Cache plugin.
- Object Cache — shown as Recommended here. Enable it if you’re on the Business or Cloud plan — it reduces database load significantly on busy sites.
- Daily Backup — check if it’s active. On the Premium plan, it’s not included by default; you’ll need a backup plugin.
Step 13: Enter Your WordPress Dashboard
Click Edit Website or go directly to yourdomain.com/wp-admin and log in with the credentials you set in Step 10.

This is your WordPress admin area. From here, you control everything — themes, plugins, posts, pages, settings. The Rank Math widget visible here is an SEO plugin — worth installing early since it helps you optimize content from the first post.
Your WordPress installation is complete.
Method 2 — Manual WordPress Installation (Full Control)
Most people don’t need this. But if your auto installer fails, or you’re setting up a staging environment, this method gives you complete control.
Step 1: Upload WordPress Files
Download the latest WordPress package from WordPress.org, then upload it to Hostinger using either the File Manager or an FTP client.
Via File Manager:
- Go to Files → File Manager in hPanel
- Upload the ZIP to the public_html directory
- Right-click and select Extract

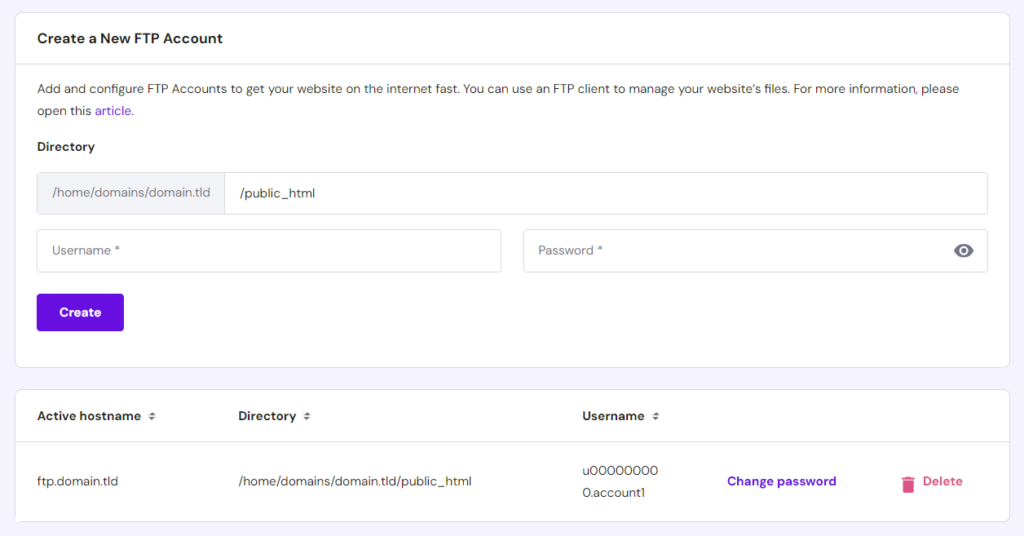
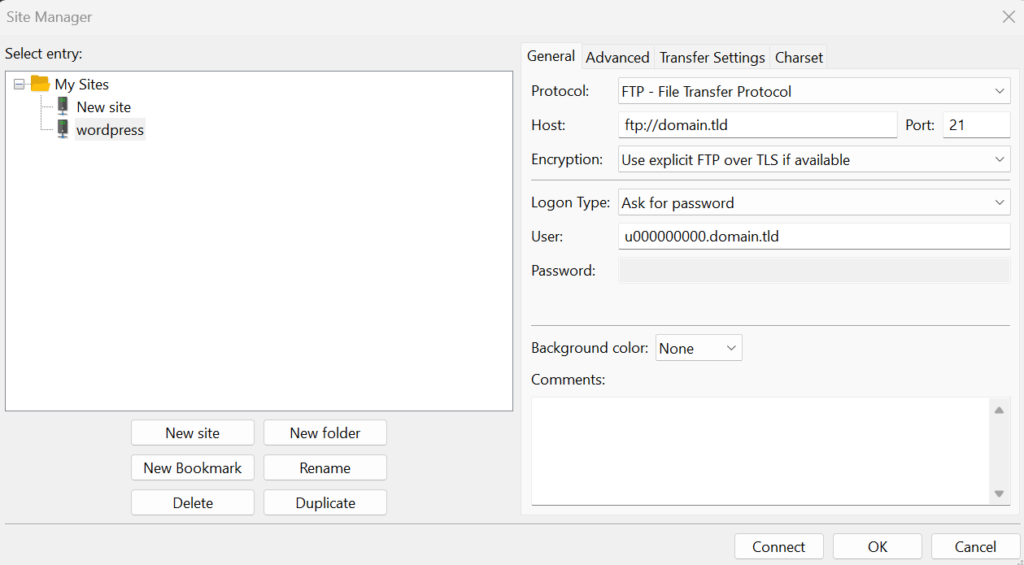
Via FTP (FileZilla):
- Go to Files → FTP Accounts in hPanel and create a new FTP account
- Open FileZilla, connect using Hostinger’s FTP details
- Upload the extracted WordPress folder to public_html
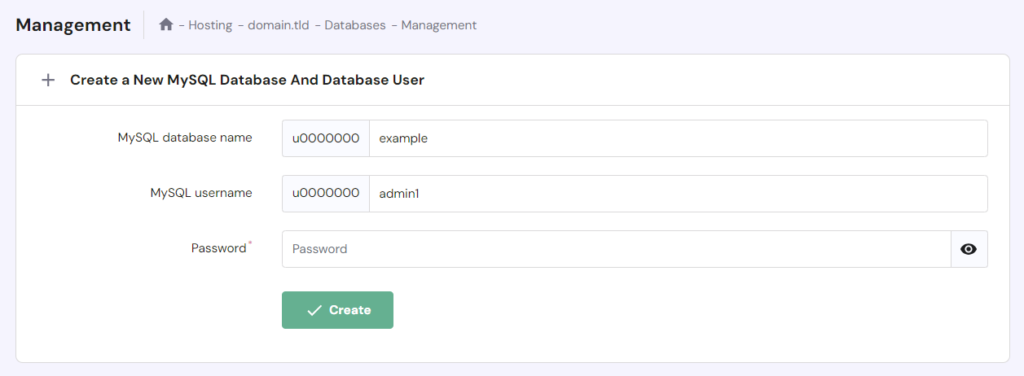
Step 2: Create a MySQL Database
- Go to Databases → Management in hPanel
- Enter a database name, username, and password → click Create
- Save these credentials — you’ll need them in the next step
Step 3: Configure wp-config.php
- In your WordPress folder, find wp-config-sample.php and rename it to wp-config.php
- Open it and replace these values with your MySQL credentials:
define( 'DB_NAME', 'your_database_name' );
define( 'DB_USER', 'your_username' );
define( 'DB_PASSWORD', 'your_password' );
define( 'DB_HOST', 'localhost' );
These values are case-sensitive. One wrong character here throws the “Error Establishing a Database Connection” error.
Step 4: Run the WordPress Install Script
Open your browser and navigate to yourdomain.com/wp-admin/install.php
- Choose your language → Continue
- Enter site title, admin username, password, and email
- Uncheck Search engine visibility if you’re not ready to go live yet
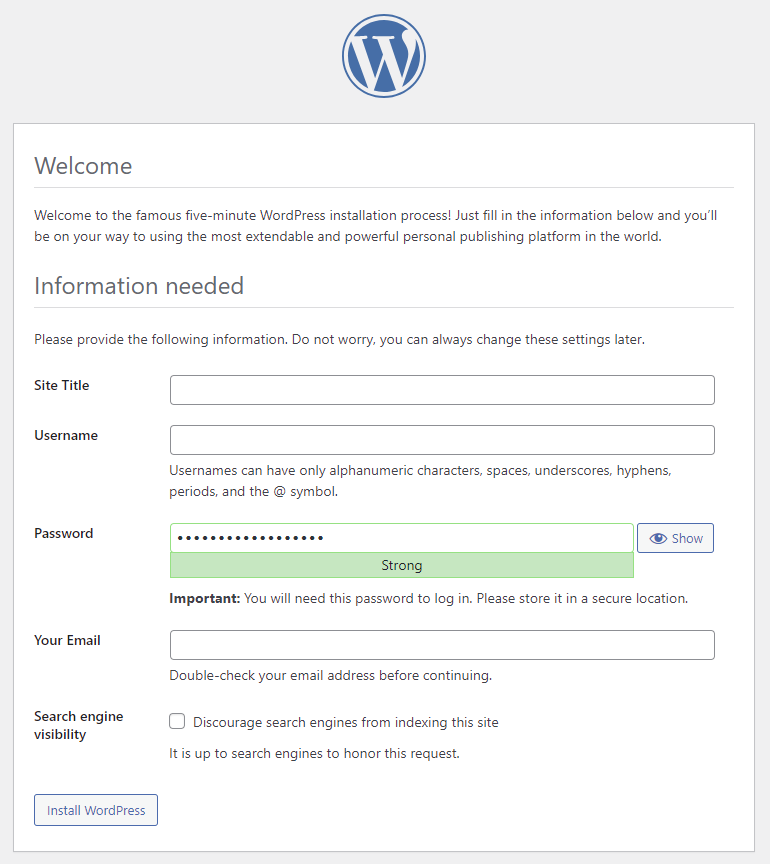
- Click Install WordPress
- Once done, log in at yourdomain.com/wp-admin
Which Hostinger Plan Do You Actually Need?
Here’s the breakdown from the official pricing (48-month plan):
| Feature | Premium | Business | Cloud Startup |
|---|---|---|---|
| Price | $2.99/mo | $3.99/mo | $7.99/mo |
| Websites | 3 | 50 | 100 |
| Storage | 20 GB SSD | 50 GB NVMe | 100 GB NVMe |
| RAM | 2 GB | 3 GB | 4 GB |
| CPU Cores | 1 | 2 | 4 |
| PHP Workers | 40 | 60 | 100 |
| Databases | 10 | 150 | 300 |
| Daily Backups | ✗ | ✓ | ✓ |
| Free CDN | ✗ | ✓ | ✓ |
| Dedicated IP | ✗ | ✗ | ✓ |
| Mailboxes/site | 2 (free 1yr) | 5 (free 1yr) | 10 (free 1yr) |
| Node.js Web Apps | — | 5 | 10 |
Best For Beginners: Premium at $2.99/mo is fine if you’re starting one blog or site. No daily backups is the real pain point — you’ll need a plugin like UpdraftPlus to cover that.
Best For Most Users: Business at $3.99/mo. The jump from 20 GB SSD to 50 GB NVMe, plus daily backups and free CDN, is worth the $1/mo difference. NVMe storage noticeably impacts read/write speed for database-heavy WordPress sites.
For Client Work or Agencies: Cloud Startup. 100 sites, 4 CPU cores, dedicated IP, and priority 24/7 support make sense at scale.
Use coupon WPDEALSEXPERT at checkout for an extra 7% off any plan. Check current pricing here →
Common Errors After Installing WordPress (And How to Fix Them)
Error Establishing a Database Connection
Almost always a wp-config.php mismatch. Check that your DB_NAME, DB_USER, and DB_PASSWORD exactly match what you created in hPanel’s database manager. If the credentials are correct, go to Databases → Management, click the three dots next to your database, and reset the password — then update wp-config.php to match.
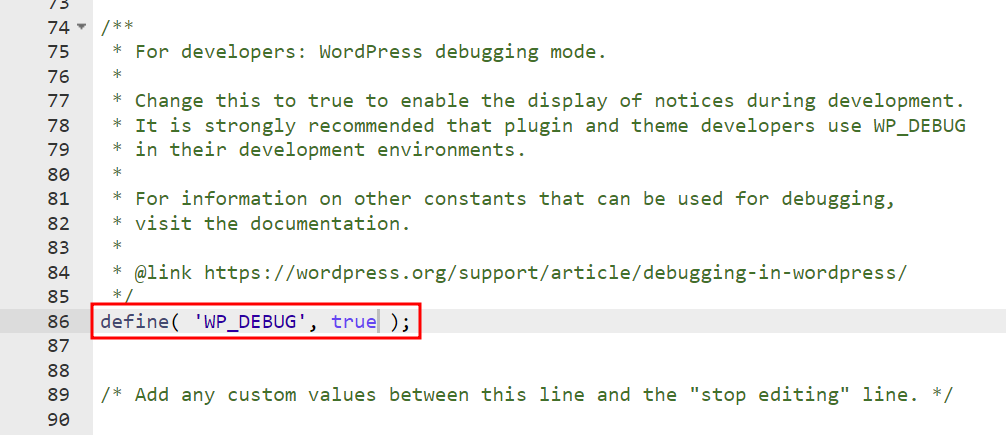
White Screen of Death
Blank white page with no error message. Common causes:
- A recently modified core file — revert the change or re-upload from WordPress.org
- Memory limit exceeded — on Hostinger, go to Advanced → PHP Configuration and increase the memory limit
- Enable WP_DEBUG in wp-config.php (set it to
true) to surface the actual error
Cannot Modify Header Information
Extra whitespace before <?php or after ?> in wp-config.php. Download the file, open in a plain text editor (not Word), confirm there’s nothing before line 1, save, and re-upload.
Site Shows Directory Listing Instead of Web Page
The server can’t find index.php as the default document. In hPanel, go to Advanced → Folder Index Manager, enter the public_html path, set indexing type to No index, and click Add.
What to Do After WordPress is Installed
Installation is just step one. Here’s what to set up immediately:
- Force HTTPS — In your WordPress management screen in hPanel, toggle Force HTTPS on. Don’t skip this.
- Install a theme — GeneratePress is lightweight and performance-friendly. Here’s how: How to Install GeneratePress Premium
- Set up essential plugins — Security, caching, SEO basics. Covered in detail here: How to Install Essential Plugins
- Permalink structure — Go to Settings → Permalinks and set to “Post name.” Do this before publishing anything.
- Delete unused themes — WordPress comes with Twenty Twenty-Three and older defaults. Keep one as a backup, delete the rest to reduce the attack surface.
- Block xmlrpc.php if you’re not using remote publishing — it’s a common brute-force target.
Once your site is live and indexed, you’ll want to look at: How to Optimize Your Content for SEO and eventually How to Monetize Your Blog.
A Quick Note from Personal Experience
I’ve been running sites on Hostinger for over five years now — across my own blogs, affiliate projects, and client work. Honestly, major installation errors are rare. The setup flow has improved considerably over time, and most issues, when they do come up, are small configuration mismatches rather than anything serious.
When something does go wrong, Hostinger’s built-in AI support — Kodee — has been genuinely useful. You describe the issue, Kodee checks the relevant details, and walks you through a fix step by step. What I find particularly well-thought-out is what happens when the issue is beyond what Kodee can resolve — it doesn’t just hand you off cold.
It creates a summary of your issue, including what was already checked, and transfers that context directly to the human support team. So when the agent joins the chat, they already know what’s happening. You don’t have to repeat yourself.
That kind of handoff matters when you’re troubleshooting something time-sensitive. It’s not a feature most hosts talk about, but it makes a practical difference.
Frequently Asked Questions
Can I install WordPress on Hostinger for free?
WordPress software itself is free. You need a paid Hostinger hosting plan to run it — starting at $2.99/mo on the 48-month plan. Hostinger does not offer a permanently free hosting tier for WordPress.
Which method is best for a complete beginner?
Method 1 covered in this guide — using hPanel’s Auto Installer. No file uploads, no database setup, no technical knowledge needed. Just follow the 13 steps, and WordPress will be live in minutes.
Does Hostinger install WordPress automatically?
On Business and Cloud plans, yes — the onboarding flow runs the install for you. On Premium, you use the Auto Installer, which still requires just a few clicks. Full manual installation is only needed in edge cases.
What’s the difference between hPanel Auto Installer and Softaculous?
Hostinger uses its own Auto Installer through hPanel. Softaculous is a third-party script library available on cPanel and Plesk-based hosts. If your host uses cPanel instead of hPanel, you’d use Softaculous. On Hostinger, stick with the built-in Auto Installer.
Will my WordPress site slow down on Hostinger’s Premium plan?
At low to moderate traffic, no. The Premium plan has 40 PHP workers, which is workable for a new site. Where it becomes a bottleneck is under traffic spikes — a single viral post can max out workers quickly. If you’re expecting growth, the Business plan’s 60 workers and NVMe storage handle load better. From what I observed while setting up client sites on Premium, adding a good caching plugin (LiteSpeed Cache works natively with Hostinger’s stack) largely offsets the resource difference.
Is there a free trial on Hostinger?
No free trial, but there’s a 30-day money-back guarantee on all plans. If you’re not satisfied within 30 days, you can request a full refund.
My domain is registered with GoDaddy or Namecheap — can I still use it on Hostinger?
Yes, absolutely. You just need to update the nameservers at your current domain registrar. Point them to ns1.dns-parking.com and ns2.dns-parking.com — the same details are visible inside hPanel when you go through the domain connection steps. Once updated, allow 2 to 24 hours for DNS propagation. During this window, the site may not load in all locations — that’s expected behavior, not a misconfiguration.
Can I change my WordPress admin username after installation?
Not directly through the WordPress dashboard — the username field is locked. You’d need to either add a new admin user with the preferred username and delete the original, or update it directly in the database via phpMyAdmin.
Bottom Line
For most people reading this — beginners, bloggers, small business owners — the hPanel onboarding flow gets WordPress live in under 5 minutes. Pick the Business plan if you can; the NVMe storage, daily backups, and free CDN make it genuinely worth the extra dollar per month over Premium.
Once WordPress is installed, the real work begins — theme, plugins, content, SEO. If you’re building a blog from scratch, a good next step is figuring out how to choose a niche and what platform structure works for you before publishing anything.
Use code WPDEALSEXPERT at checkout for 7% extra off. Get Hostinger at the lowest price →